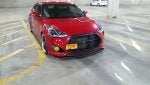
I've only had these on for a few hours but I've gotten some good info about them during my install and testing.
![]()
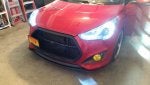
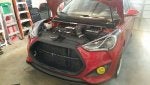
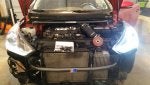
The install was the same as any factory headlight work. Gotta remove the bumper from the top and sides at least. Mine was a little more complicated since I was also installing H1 HID bulbs to go with my existing kit.
Fitment and packaging is great and the whole thing seems as sturdy as the OEM set. The housing feels OEM but the way the projector fits is a dead give away as it sits higher than the OEM ones and further back. It comes with the resistors for the LED sequential turn signals as well as all the bulbs for operation and the adesire ti mout it alread on there.
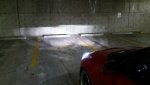
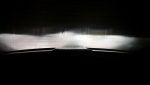
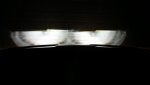
Cut off is crisper then the OEM lights but there is less spread. (HIDs in both). Some irritating hot spots while driving to but I believe these are from the HID bulbs, much like we have with the H11b vs. H11.
OEM:
![]()
Junyan:
![]()
Part of the odd spread is because of how I had to adjust the lights to keep from vibrating. This may only be an issues for guys with stiffer mounts. It is also likely possible to hard mount the projectors with an epoxy to keep them from doing this.
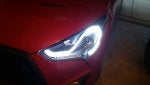
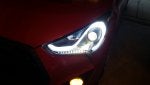
The LED accents are MUCH brighter. Here's comparison. You'll have to click on the pic to see the full size and yes... the passenger side OEM accents are on.
![]()
Couple notes for buyers:
1. While possible to adjust them after they bumper is back on its much easier to do this before you do.
2. While driving I noticed the passenger light was vibrating pretty badly. I stopped and as the car idled it was vibrating. When I hit it gently it got worse. Fret not because I figured out how to fix it.
The drivers side wasn't doing it and both bulbs were firmly in place so I started adjusting the drivers side light. At a certain point in the horizontal adjustment, that light started to vibrate too. I moved it back and it stopped. Did the same treatment to the passenger side one and it was fixed. No more vibration.
3. The projector sits high in the housing and so it does in the cover. With HIDs installed it barely cleared the cover so make sure your wiring is out of the way when the cover goes back on.
4. Be sure not to mount the resistor on the housing it self as they can get very hot. I used the radiator support.
![]()
![]()
![]()
![]()
![]()
The install was the same as any factory headlight work. Gotta remove the bumper from the top and sides at least. Mine was a little more complicated since I was also installing H1 HID bulbs to go with my existing kit.
Fitment and packaging is great and the whole thing seems as sturdy as the OEM set. The housing feels OEM but the way the projector fits is a dead give away as it sits higher than the OEM ones and further back. It comes with the resistors for the LED sequential turn signals as well as all the bulbs for operation and the adesire ti mout it alread on there.
Cut off is crisper then the OEM lights but there is less spread. (HIDs in both). Some irritating hot spots while driving to but I believe these are from the HID bulbs, much like we have with the H11b vs. H11.
OEM:
Junyan:
Part of the odd spread is because of how I had to adjust the lights to keep from vibrating. This may only be an issues for guys with stiffer mounts. It is also likely possible to hard mount the projectors with an epoxy to keep them from doing this.
The LED accents are MUCH brighter. Here's comparison. You'll have to click on the pic to see the full size and yes... the passenger side OEM accents are on.
Couple notes for buyers:
1. While possible to adjust them after they bumper is back on its much easier to do this before you do.
2. While driving I noticed the passenger light was vibrating pretty badly. I stopped and as the car idled it was vibrating. When I hit it gently it got worse. Fret not because I figured out how to fix it.
The drivers side wasn't doing it and both bulbs were firmly in place so I started adjusting the drivers side light. At a certain point in the horizontal adjustment, that light started to vibrate too. I moved it back and it stopped. Did the same treatment to the passenger side one and it was fixed. No more vibration.
3. The projector sits high in the housing and so it does in the cover. With HIDs installed it barely cleared the cover so make sure your wiring is out of the way when the cover goes back on.
4. Be sure not to mount the resistor on the housing it self as they can get very hot. I used the radiator support.